
Tips

Gold jewelry should be maintained appropriately so that it will exude sheer beauty every time you will wear it. If you want to keep your gold jewelry clean, it is a straightforward process that you can do on your own at home. Even though gold does not easily tarnish unlike other metals, there is still the possibility that dirt and grime will accumulate over time, thus making the jewelry dull.
Cleaning gold jewelry at home is simple and will not cost a lot. It can help restore the beauty and luster of your jewelry, and the steps are simple to follow, whichever method you choose. Several effective methods can maintain the shine and beauty of your gold jewelry.
METHOD ONE
One of the effective cleaning methods for your gold jewelry is to use warm water and soap. You might be skeptical at first, but you can clean your gold jewelry using soap and water only. This method works best on gold pieces that are plain and without any gemstones. There are specific steps to follow if you are going to use soap and water.
- Fill a bowl with warm water and add a mild soap
- Dip the gold jewelry into the mixture
- Allow the jewelry to soak for about 20 minutes
- After soaking, dry the gold jewelry using a clean, dry cloth
- Allow the gold jewelry to air dry on a towel entirely before wearing it
With this cleaning method, it will effectively eliminate all the oils and dirt that accumulated from beauty products or from daily wear that lead to a duller appearance. This method is a fast and easy way to restore the beauty of your jewelry without a lot of hassle.
METHOD TWO
If you have gold jewelry that is embedded with gemstones, you can still clean them at home without causing any damage to the gems. An important consideration with such jewelry pieces is that you should never submerge them into the water since water can end up trapped in the setting, thus causing rust or the discoloration of the setting or stones as well as causing the stones to fall out after some time.
If you are going to clean your gold jewelry embedded with stones, simply follow the steps of Method One, but instead of dipping your jewelry in the bowl of water, use a clean, dry cloth that has been dampened with the mixture of warm water and soap.
All you have to do is to use the cloth to clean the jewelry by rubbing gently over the setting and gemstones. Use a different damp cloth to rinse and dry the jewelry.
METHOD THREE
Another method to clean your gold jewelry is by using an ammonia solution.
With this method, any cleaning should be carried out cautiously. Even though it is effective in removing grime and dirt, cleaning your jewelry with ammonia frequently will cause damage or also leave it tinted. The materials needed for this cleaning method includes a soft polishing cloth, small bowl, water, and ammonia. You should take note of the steps to clean your gold jewelry effectively.
- Start by combining a solution that is comprised of 1 part ammonia with 6 parts water in the bowl
- Soak the gold jewelry in the solution for about 1 minute
- Rinse the jewelry thoroughly under running water to make sure that the cleaning solution is completely removed
- Dry the jewelry using a soft polishing cloth
- Position the gold jewelry upside down so that it will air dry. In doing so, it allows any remaining water to drain away without producing damage to the stone or end up stuck in the setting.
For those hard-to-reach spots that are difficult to clean with just a simple soak or rubbing, you can use a soft-bristled toothbrush and dampen it with warm water. Use the toothbrush to clean the hard-to-reach areas such as the gold engravings in which dirt and grime can accumulate.
Always take note that you should only use a toothbrush with soft bristles and be gentle with the scrubbing so as not to cause damage. In case your jewelry entails extensive cleaning, it is best to take it to a professional to avoid any damage.
POST-CLEANING
Once you have adequately cleaned your gold jewelry, you can wear it again or store it.
If you decide to store it, make sure that every piece of gold jewelry is separately stored to avoid scratching or damaging. Those that have a delicate gold chain should be hanged from a hook to prevent tangling.
Another option is to stretch out the chain of a necklace or bracelet in an anti-tarnish tissue and roll it up and position in your jewelry box in a flat position. This can help prevent the chains from getting knotted and minimize the occurrence of tarnish. You can even store the jewelry in a plastic zip bag. Just make sure that you will squeeze out all the air before closing it.
Taking Care of Your Sterling Silver
With proper care, quality sterling silver will last a lifetime. However, because of the alloy mixed to make sterling silver is more susceptible to tarnish and corrosion than regular silver. To minimize such damage, it is essential to store your sterling silver jewelry either in a cloth pouch or in a separate compartment in your jewelry box. Avoid exposing it to household chemicals when cleaning with bleach or ammonia, or when swimming in water containing chlorine such as a swimming pool, as these chemicals can damage silver.
Care should also be taken to prevent silver tarnish build-up, a dulling that naturally occurs when silver reacts with sulfur or hydrogen sulfide in the air. To clean your silver, use polishes specifically designated to remove tarnish. Although wearing your silver jewelry often is the best way to prevent tarnish from building up, regular cleanings of all your silver items will prevent tarnish and keep your silver bright and sparkling.
10 Tested & Proven DIY Methods to Clean Your Silver Jewelry!
- Baking Soda & Aluminum Foil
- Lemon & Salt Bath
- Toothpaste
- Coca Cola
- Window Cleaner
- Beer
- Ketchup
- Vinegar
- Vodka
- Laundry Detergent
We all have pieces of jewelry lying around or that we wear everyday but have neglected taking care of it. In order to keep your jewelry in its perfect silver state you must clean it and regularly take care of it. There are special products that you can buy in the store but they can be expensive and sometimes harsh, you may only need this in the toughest of tarnish situations. The best thing about silver is that it can be cleaned up using general household items and products, and we are here to find out which ones work.
After researching this topic we discovered that there were plenty of ideas but not much to prove their efficiency, so we decided to provide true and honest results of all your options.
We have tried and tested 10 different ways in which you can clean your silver using only products that you already have at home. This experiment has been done to help you choose how best to clean your silver jewelry.
First of all you should know…
What is tarnish?
Tarnish is a thin layer of corrosion that quickly forms over your silver jewelry, resulting in the formation of a dark coating that is undesirable to look at. Tarnish is basically the dulling of silver that typically occurs as a chemical reaction with hydrogen sulfide or sulfur present in the atmosphere. In most cases, some believe that the tarnish is caused by oxidation but it is not true since silver is not reactive to water or oxygen at average temperatures. Nevertheless, the metal in the alloy such as copper does tend to react with oxygen.
This is why silver is generally stored in air-restricted spaces – although since most jewelry boxes and cabinets are not airtight it still allows for the tarnishing process, just at a slower pace. In addition to the air, your silver jewelry may very well react with you skins alkaline levels. The presence of Sulphur and amino acids that can be found in perspiration can cause discoloration to your skin and jewelry. Cleaning the jewelry regularly helps to avoid this type of discoloration.
The Big Test!
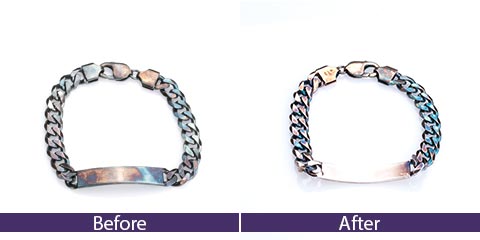
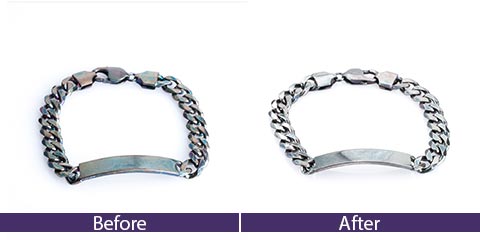
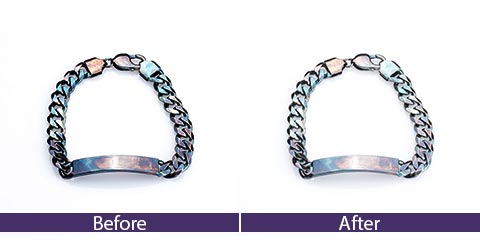
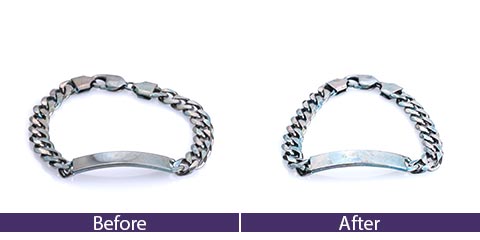
We are going to try, test and show you the results of 10 different recommended products, so that we can determine the best DIY method to cleaning silver jewelry at home. Each method will be rated out of 10 on its success PLUS we will be showing you the before and after results. Please bear in mind that we have used the toughest of tarnish situations in this test - So some of them may work better on less problematic situations.
Method #1
Baking Soda and Aluminum Foil
Add boiling water and baking soda to a bowl layered with aluminum foil. Make sure the aluminum foil is shiny side up. Remove after 1-3 minutes, rinse under cool water and rub dry with a soft cloth. MAKE SURE YOU USE A NEW PIECE OF ALUMINUM FOIL EVERY TIME.
This process causes a chemical reaction that removes tarnish from the silver within second or minutes.
Results
You can see the process happening and the dark, discolored piece of jewelry changing back to its original state. It is truly amazing and is by far our best DIY method yet.
TESTERS RATING: 10 / 10
We captured the process of cleaning our silver with baking soda and aluminium - so here is the video for you to see for yourself the amazing process and results.
These are the things you will need:
- A soup bowl (any vessel of size that you need for the items you are de-tarnishing)
- Aluminum foil
- Boiling water
- 1 tablespoon of baking soda for each cup of water
- Spoon/kitchen tongs
- A dry cleaning cloth
Here is a step by step of how to work this amazing technique:
- Bring the water to a boil – it should be enough water to reach the top of the bowl
- Take your soup bowl/vessel and line it with aluminum foil, shiny side up
- Add 1 tablespoon of baking soda with each cup of water into the bowl and be prepared that the solution will bubble.
- Instantly place the silver jewelry in the dish, it can be one or more pieces as long as it fits in the bowl. Ensure that the jewelry is touching the aluminum foil – this is an essential part of the process for the chemical reaction to occur
- Leave in the solution for 2-5 minutes. If the level of tarnishing is really bad then you can leave it in up to 10 minutes.
- Remove the jewelry with a pair of kitchen tongs or a spoon. Rinse under cool water. You may then shine it with the dry cleaning cloth. Prepare to be amazed!

Method #2
Lemon and Salt Bath
Squeeze a lemon into a bowl with 3 tablespoons of salt and hot water and placed the tarnished bracelet to rest in there for 5 minutes. Remove and rub with soft cloth.
Results
The tarnish was tough to remove using this solution with a regular cloth - It hurt my fingers rubbing. After the experiment with the regular cloth I took a white silver cleaning cloth, which really helped in lifting the tarnish. This would only be efficient if you have a silver cleaning cloth, it is too much effort with a regular cloth and does not bring perfect results.


Toothpaste
Take a pea sized amount of toothpaste on a dish and rub into the silver using a dish washing sponge. Rinse in warm water.
Results
The toothpaste removed some of the tarnish but only slightly and not enough to make a fully successful difference. It came off in patches rather than fading the entire piece. Using a toothbrush to try give it some extra friction and get into those more intricate spaces like the links of the bracelet proved a better system in terms of removal, but it scratched the silver so I wouldn’t recommend this method.

Coca Cola
Pour some coca cola into a bowl and soak the jewelry in it for 10 minutes - remove and rub with a cloth.
Results
I really expected the coca cola to strip the silver clean but unfortunately the effect was minimal and not worth the time spent.
Window Cleaner
Spray the window cleaner onto a soft cloth and rub silver.
Results
The silver is shinier but no color improvement at all. This product is great to use after you have cleaned your jewelry as it gives it a nice shine.
Method #6
Beer
Pour a cup of beer into a bowl and soak the jewelry in there for 5-10 minutes. Remove and rub clean with a cloth.
Results
This method did not provide perfect results but it definitely lifted the shade a touch lighter. I certainly expected more from this considering how many times I have heard it mentioned as a successful silver cleaning method. That being said I could see a difference, just not good enough to wear.

Method #7
Ketchup
Squeeze a small amount of ketchup onto a toothbrush and rub into the silver.
Results
I could see a slight difference but it was not as successful as I had hoped for. Also it is a bit messy and smells unpleasant, just for that I would recommend against it.

Method #8
Vinegar
Soak the jewelry in a bowl of vinegar, then dip the cloth and rub the jewelry with the cloth.
Results
After all that has been said of this method it was not even closely effective as expected. You could see a slight difference but not enough that the jewelry was even wearable.

Method #9
Vodka
Pour a cup of vodka into a bowl and soak the silver jewerly for 5 minutes. Dip a cloth into the vodka, remove jewelry and rub with cloth.
Results
Not as effective as expected but lifted the tarnish slightly on larger area of silver but not much on the chain.
Method #10
Laundry Detergent
Pour one small cup of detergent into a bowl of hot water and place the silver jewelry inside. Leave for 5 minutes, remove and rub with a soft cloth.
Results
The laundry detergent reacts with the water creating a foamy substance a little like how the baking soda reacts, but much foamier. We decided to use the Vanish type of detergent, knowing that it is a popular product and hoping that it would be more effective. It does not remove tough tarnish stains but it does lift the darkness and it cleans any dirt or gunk from the jewelry - plus it smells great!

There are customers who swear by Simichrome Polish. Simichrome all metal polish brings gold, silver, brass, aluminum, pewter, copper and stainless steel to a brilliant shine. It also leaves a thin protective coating to help prevent tarnishing.

Some consider the best homemade jewelry cleaning solution to be a mixture of a few drops of Dawn dish detergent in warm, not hot, water.
Let the piece sit in the solution for a few minutes, longer if it's very dirty, then gently scrub with a new, baby-size, soft toothbrush. To rinse, place the item in a new container of lukewarm water.
Make sure the water isn't too hot or too cold, as some gemstones do not take well to drastic changes in temperature.
You can dry the piece off with a paper towel or a regular cloth, as long as you're careful not to snag the prongs on the fibers.
Visiting Your Jeweler
While dish detergent and warm water is the best homemade jewelry cleaner, there's no substitute for visiting your jeweler for a cleaning. Your jeweler will know the proper procedures depending on the specific type of gemstone and metal, as well as check the item over for any damage beforehand.
Prevention of tarnishing
Are you wondering if there is prevention to the cause of tarnishing? Well there are some steps you can take to help avoid the chemical reaction that causes this corrosive layer on your silver jewelry.
- Gently rub a small amount of conditioner into the material and blend with a soft cloth. This polishes the silver and protects it.
- Place some chalk into the box or drawer of where your jewelry is stored. Chalk absorbs the moisture in the air, essentially stalling the Sulphur components from reaching the silver.
- You should make an effort to regularly clean your jewelry – regular cleaning protects it from discoloration.
- Try not to swim in chlorinated pools or clean using bleach or ammonia containing products, while wearing your silver jewelry
Summary
To summarize, there are two single fantastic methods to cleaning silver jewelry, which are using baking soda with Aluminum foil and the other being a silver cleaning solution such as ‘Silvo’. The products you get from the store are fantastic, producing amazing results, but it should only be used in the toughest of tarnish situations. This type of product usually strips a layer of the silver leaving you with a fresh new surface of silver. Luckily for us we can use our #1 method to clean our jewelry, which is just as successful and less expensive.
After doing this research experiment we have come to the conclusion that a white ‘silver cleaning’ cloth is one of the best instruments that you could have in possession for cleaning your silver products. We did not use this in the experiment as we expect that most people do not have them at home, however after some of the methods were tried and tested, we used the silver cleaning cloth to see if it helped remove the tarnish any further. In some cases it really did make a difference. Even after the best method of the baking soda and aluminum, you can use the silver cleaning cloth to just give it an extra shine.
You can purchase a white ‘Silver Cleaning’ cloth from a silver selling store, cobblers or online stores.
* Disclosure
Usually tarnish can take a while to build-up on silver. For this experiment we used pure oxide in order to quickly increase the tarnishing process on the jewelry.
Ring Size Conversion
Buying jewelry from all over the world has never been easier. With just the click of a button, you can now order that piece of jewelry you have always wanted.
|
Inside Diameter |
Inside Circumference |
Sizes |
|||
|
MM |
Inches |
MM |
Inches |
British & Australian |
US & Canada |
|
14.05 |
0.553 |
44.14 |
1.74 |
F |
3 |
|
14.45 |
0.569 |
45.40 |
1.79 |
G 1/4 |
3.5 |
|
14.86 |
0.585 |
46.68 |
1.84 |
H 1/2 |
4 |
|
15.27 |
0.601 |
47.97 |
1.89 |
I 1/2 |
4.5 |
|
15.70 |
0.618 |
49.32 |
1.94 |
J 1/2 |
5 |
|
16.10 |
0.634 |
50.58 |
1.99 |
L |
5.5 |
|
16.51 |
0.650 |
51.87 |
2.04 |
M |
6 |
|
16.92 |
0.666 |
53.16 |
2.09 |
N |
6.5 |
|
17.35 |
0.683 |
54.51 |
2.15 |
O |
7 |
|
17.75 |
0.699 |
55.76 |
2.20 |
P |
7.5 |
|
18.19 |
0.716 |
57.15 |
2.25 |
Q |
8 |
|
18.53 |
0.729 |
58.21 |
2.29 |
Q 3/4 |
8.5 |
|
18.89 |
0.748 |
59.34 |
2.35 |
R 3/4 |
9 |
|
19.41 |
0.764 |
60.98 |
2.40 |
S 3/4 |
9.5 |
|
19.84 |
0.781 |
62.33 |
2.45 |
T 1/2 |
10 |
|
20.20 |
0.797 |
63.46 |
2.50 |
U 1/2 |
10.5 |
|
20.68 |
0.814 |
64.97 |
2.56 |
V 1/2 |
11 |
|
21.08 |
0.830 |
66.22 |
2.61 |
W 3/4 |
11.5 |
|
21.49 |
0.846 |
67.51 |
2.66 |
Y |
12 |
|
21.89 |
0.862 |
68.77 |
2.71 |
Z |
12.5 |
|
22.33 |
0.879 |
70.15 |
2.76 |
Z 1 |
13 |
However, it is important to remember that different places throughout the world use different units of measurement, whether it's millimeters, inches, or even a letter. Hence, it is always vital to check that you are buying the correct size for you.
Rings, especially, fall into this category. Countries in Europe, North and South America, and the UK and the nations of the Commonwealth all use different systems for measuring ring sizes, so what is correct in one place might not necessarily be correct in another.
Use our ring size conversion chart below to make sure you are choosing the correct size for you.
How to Find Your Ring Size
Purchasing a ring for yourself is already an overwhelming task, but there's more pressure, especially if you're buying for a loved one and if you're proposing. Purchasing a ring, whether for yourself or for a loved one, is something that you should never go wrong with, especially when it comes to the ring size. So before making that ring purchase, whether it's for yourself or for another person dear to you, it is vital to know the right ring size.
Certain factors need to be considered when measuring your fingers and to get the right ring size. The perfect ring size should fit comfortably on your finger in a way that it fits snuggly enough and not fall off or simply slide out of it.
Here are the factors that need to be considered to get an accurate ring size measurement:
Our ring size will have a slight difference depending on what time of day you measure it or the weather, so when measuring your finger size, do it at the time of day when it is the largest. Fingers are smaller in the morning, so it's best to measure your finger at the end of the day or late afternoon. Also, do not measure your fingers when you feel cold as our finger size is smaller in cold temperatures but swells in heat. Pregnancy and athletic workouts also can cause our fingers to puff up.

Our ring size on our left hand is different from our right hand. When measuring for a ring, do not assume that the measurement on your left ring finger will fit perfectly to your right ring finger.
The correct measurement not only needs to fit comfortably on the place where a ring sits, but it should also fit snuggly over your knuckle. Not too loose that it falls off quickly but also not too tight that you'll have to go great lengths just to take the ring off.
Wider band rings will have a tighter fit compared to rings of the same size but having a narrower band.
If it's a surprise gift to a special someone, you can ask a trusted friend or a family member to do it for you, but make sure that they do it at the right time of the day when the finger size is largest.
Tips On Caring for Your Gold Plated Jewelry

It is never easy to choose a piece of jewelry, and it's also not that easy to buy one. As much as we always wanted to get the most exquisite quality gold jewelry, our budget may not agree with us all the time. Buying gold plated jewelry is a great option when you're looking for an accessory or a gift that doesn't break your bank, and this goes for any type of jewelry, may it be a ring, bracelet, or name necklace. Gold plating is a process where a thin layer of gold is placed on to coat the surface of another metal.
Nowadays, having gold plated jewelry is not only for those who can't afford full gold jewelry. They are very popular with fashionistas out there because of its practicality and because it's available in various designs and styles that go perfectly well with any piece of clothing. To decrease the chances of wearing out, here are easy ways on keeping the luster of your gold plated jewelry. As it is a thin layer of gold, extra care should be taken to maximize its lifespan.
- Do not spray on perfume or other sprays while wearing your gold plated jewelry. Wear your jewelry after you have sprayed on your favorite perfume so that chemicals on the shower or perfume does not interact with your jewelry's metal.
- Wait until your lotion or cream is dry or has been absorbed by your skin before you wear your gold plated ring, bracelet or necklace.
- Substances like oil, nail polish, nail polish remover, chlorine, perfume, and the like may react with metal/plated jewelry and will cause it to tarnish quickly. This also goes with sweat, so make sure you don't forget to remove your gold plated jewelry when you exercise or anything that would require heavy physical work, and also when swimming.
- Every after use, clean your plated jewelry with a cotton ball or a very soft cloth to remove any dust and dirt it has acquired. Gently rubbing the surface of your gold plated jewelry using a soft jewelry cloth also helps restore shine.
- If your jewelry needs more cleaning, you may clean it with warm, soapy water. Soak it for a few minutes, and you may clean it with a soft brush. Stay away from jewelry cleaners and antibacterial soaps, which may have certain components that will just make your gold plated jewelry tarnish more quickly.
- To avoid scratches, wrap your jewelry in a soft cloth after cleaning or keep it in a jewelry box separate from other types of jewelry you have.
Necklace Size Chart - Choosing the Right Necklace Length

Buying a new necklace is exciting, but before rushing into any purchase, it is essential to factor in not only the look of the pendant but the length of the chain. It is necessary to consider the chain length that fits factors beyond your outfit and personal style. Necklaces or chains come in industry-standard lengths, five different lengths for women, and four for men. This handy guide will assist you in selecting the right necklace length that will best showcase your jewelry, accentuate your best features, suit your body type, and frame your face. When worn correctly, jewelry can draw people to look at your best assets and focus away attention from the features you would rather not flaunt. Our chains do not include the size of the pendant; you need to take into consideration between 1-2 inches when selecting it.
Factors to Consider When Choosing Your Necklace Chain Length
The first step is to learn where different necklace lengths fall on the body for either men or women. This will assist you in choosing which chain length you desire.
Standard Necklace Lengths for Women
Women's necklaces are usually sold in even-inch lengths. Follow this chart to learn where each necklace length falls on the average woman's body.
|
Necklace Length |
Position on the Body |
|
14" Necklace |
Fits like a choker and wraps closely around the neck |
|
16" Necklace |
Falls perfectly around the base of the neck like a collar. On a petite woman it hangs loosely around the neck and falls just at the collarbone. On a plus size women it might sit more like a choker. |
|
18" Necklace |
A common choice for women that sits elegantly on the collarbone. |
|
20" Necklace |
Will fall just below the collarbone. |
|
22" Necklace |
Falls at or just above the top of the bust |
Choosing the Right Necklace Length for the Female Body
The right necklace can really pull any outfit together and be the focal point of a woman's body. It is therefore important to consider how the length of the necklace will compliment your body. When selecting the correct chain length for your necklace it is important to consider such features as your neck, your height, your body type and your face shape.
Neck Size
If possible, take the time to measure your neck before purchasing any necklace and most importantly a choker. The easiest way to measure your neck is to gently take a soft measuring tape and wrap it closely around your neck. Whatever your neck measurement is, add two inches to that and that's a comfortable length for chokers, which are usually sized at 16 inches; add four inches to that, and that's an excellent length for a pendant or name necklace which is traditionally attached on an 18-inch chain for women. Chokers work best for people with long necks, while short-necked individuals are better off staying away from it.
Height
Your height is another factor to consider when choosing the perfect necklace chain to flatter your body type. Women below 5'4" look best in 16 to 20-inch necklace lengths. A long necklace tends to overwhelm a smaller frame. Women who fall between the height of 5'4" to 5'7" can wear a necklace of any length. Taller women who are 5'7" or above can wear any length necklace. Longer chain style necklaces look best on taller women as they accentuate a tall frame.
Body Type
In terms of necklaces, remember that people's eyes will stop at the point where your necklace ends, so if you don't want them looking at that part, then avoid necklaces that end there. For women with a smaller bust, a long thin chain or long layered chains would look great on you. The kind of necklace that sits below the breast line should be avoided by full-figured women as this length necklace will not hang properly. Instead, try a necklace that sits slightly higher on the body, such as an 18- to 22-inch necklace.
Face Shape
Another purpose of necklaces, aside from being an accessory, is that it actually helps frame your face. As with the body type, a necklace can help you accentuate your strongest facial features and alter the way your face is perceived by others.
Women with round faces should avoid short necklaces or chokers as they will accentuate the roundness of her face.
Those with oval-shaped faces can take advantage of any necklace fad since they can wear almost any shape, length, or type of necklace.
For those with a long-shape face who may want to broaden and soften the shape of their faces, should wear shorter necklaces. Short, round necklaces will keep from adding length. Look for choker and princess necklaces, measuring between 16" – 18".
Heart-shaped faces look great with chokers or any short necklace as they create an illusion of fullness and balance out a narrow chin.

Choosing the right necklace is similar to shopping for the perfect pair of jeans. It's important to consider what flatters your body type and not jump to buy solely based on what's currently on-trend. At Noa Personalized Jewelry we feature a range of chain lengths and styles of necklaces you are sure to love. Better yet, they all can be personalized.
How to Measure Your Wrist for the Right Bracelet Size
Bracelets are great accessories to add to your collection. Its origin can be traced way back to 40,000 BP. The word bracelet is from the Greek word "brachile," meaning "of the arm." Materials used in ancient bracelets are bones, stones, animal teeth and wood. Bracelets were believed to serve religious and spiritual interest in some cultures, while a class symbol for others.
A very famous bracelet in history is the Scarab Bracelet which is one of the most renowned symbols of ancient Egypt. The scarab bracelet represented rebirth and restoration for the Egyptians.
The trick with having the perfect bracelet is its fit, making sure it's loose enough to move and dangle nicely on top of your hand while tight enough for it not to fall off your hand. Ordering bracelets most especially online is much easier if you have the right wrist size. So we've come up with a blog that has easy instructions on how to measure your wrist correctly and ensure a great fitting bracelet.

For a regular chain bracelet or bracelets with locks
- You'll need any of these three to measure your wrist. Prepare a flexible measuring tape, a string, or a strip of paper enough to go around your wrist.
- Using your measuring tool, measure just above your wrist bone by wrapping the measuring tape or paper around it. See sample picture below:
- Some suggest that, for charm bracelets or other types of bracelets that you want draping across the top of your hand, measure the point where your wrist meets your hand and add approximately a half-inch allowance to that.
- Mark or take note of the part where your measuring tool overlaps. If you're using a measuring tape, simply add between ¼ inch and 1 inch depending on how tight you like your bracelet to be. Usually people add half an inch (½ inch) to their actual wrist size for a comfortable fit.
- To get your wrist measurement, if you're using a strip of paper or string, simply lay it flat on a surface and measure the length from your starting point to the end mark you've made, and then add to that measurement your desired inch allowance.
I suggest that if this is your first time buying bracelets online, after getting your measurement (using the tape measure or strip of paper), try to experiment on various inch allowances and move it around and up and down along your wrist to ensure you're comfortable. You can do this by wrapping the measured strip of paper or string around your wrist and taping/joining the edges and see if you're comfortable.
For bangles
Bangles are rigid, don't have openings, and need to slip through or over the hand onto the wrist. Having bangles that are too large is very uncomfortable with the fear of the bangles falling off your hand while having it too small would be torture whenever you try to slip it on or off your wrist. But there are basically two kinds of bangles, an adjustable one and the fixed size bangle. For adjustable bangles, you can simply do the regular bracelet measurement stated above. With adjustable bangles, you wouldn't have to worry that they might slip off your hands, so in general, it's a good choice.
Bangles are measured or sized by their diameter in inches. If you have good fitting bangles already then you can simply measure the diameter of those to find your size; otherwise, especially for fixed-size bangles, you'll need a tape measure or a strip of paper for measuring and here're what you'll need to do:
- Squash or squeeze your fingers together towards the center and make it as narrow as possible. Another trick is to squash your fingers together and bring your thumb and your little/pinky finger together towards the center or simply pretend that you slipping a bangle.
- Wrap the measuring tape or strip of paper around the widest part of your squashed hand. As a tip, measure around the knuckles and use the knuckle of the thumb as a starting point, this area around the knuckles is the widest part. Pull the measuring tape or strip of paper just tight enough to pass around this widest part. See picture below for reference:
- If you're using a strip of paper, mark the part where it overlaps with a pen. Lay down the paper on a flat surface and measure it with a ruler from the starting point to the point of overlap. If it's a tape measure, then simply take note of the measurement. This measurement is the circumference of your hand.
- Once you have the circumference, you have to get the diameter. Tape the ends together (starting point and the point of overlap) and measure across the widest point of the paper bracelet/circle making sure that you are not distorting the circle shape in any way, and that is the diameter.
For those with thin wrists, you may want to try a different bangle sizing technique. This can be done by measuring the width of your closed fist from the top center of one knuckle to the other. And then, select the closest bangle size to your measurement. Example: Small- 2 ¼", Medium- 2 ½", Large- 2 ¾". See picture below on how to measure thin wrists for bangles:
Try to slip the paper or the tape measure back and forth to make sure it will fit in through your knuckles to your wrist easily.
|
Equivalent bangle diameter, measured in inches |
Equivalent bangle diameter, measured in millimeters |
Equivalent bangle circumference, measured in inches |
Equivalent bangle circumference, measured in millimeters |
|
2.125 |
54 |
6.67 |
169.4 |
|
2.25 |
57.2 |
7.06 |
179.6 |
|
2.375 |
60.3 |
7.46 |
189.5 |
|
2.5 |
63.5 |
7.85 |
199.4 |
|
2.625 |
66.7 |
8.24 |
209.3 |
|
2.75 |
69.9 |
8.64 |
219.5 |
|
2.875 |
73 |
9.03 |
229.4 |
|
3 |
76.2 |
9.42 |
239.3 |
Bracelets certainly never go out of style so making sure that it fits just right and comfortably is essential. We at Noa Personalized Jewelry hope that this guide to measuring your wrist will help you have a better bracelet buying experience.
Birthstone Guide - Birthstones by Month

Birthstones are gemstones corresponding to one of the 12 months of the year, each with its own unique look, value, and beauty. The use of birthstones as amulets and adornments dates back to ancient times when gemstones were believed to hold wondrous cosmological powers and bring good luck and health.
Today gifts featuring birthstones such as birthstone jewelry stills holds significant meaning and value. Birthstone jewelry gifts adorned with a birthstone shows thought and personalization as well as adds a luxurious sparkle to any accessory. Find here your unique birthstone and learn its natural properties and well as its fabled mystical benefits.
Why Do Some Months Have Multiple Birthstones?
Traditionally each month is associated with one birthstone, but you will find some months have multiple birthstones. This fact does create some confusion, but the multiple options for some months were created in order to allow more affordable options in addition to the traditional, more expensive stones.
The final attempt to standardize the birthstone system came in October 2002 when December was given a third birthstone option.
Birthstones' Meaning
JANUARY
Garnet, January's birthstone, is mined in every color except blue. The most common garnet featured in birthstone jewelry is a dark, deep red that is almost brown. The garnet is associated with faith, love, and constancy, and due to such properties is considered a great gift to symbolize friendship and trust.
FEBRUARY
Purple Amethyst, the birthstone of February, is variety of quartz that shines a beautiful purple color. This gemstone is said to represent peace, serenity, and royalty. Ancient Greeks were known to wear the amethyst to protect themselves from the effects of drunkenness.
MARCH
The name Aquamarine, the March birthstone, comes from the Latin phrase, "water of the sea" due to its mesmerizing blue green color. Its colors range from pale to deep blue and are said to be mermaid treasures and were thought to have the power to keep sailors safe. The aquamarine gemstone is said to represent courage, health, and confidence.
APRIL
The diamond, the birthstone of April, is the most coveted gemstone. A diamond is the hardest natural substance and is the only gemstone prized for its complete lack of color. While the classic white diamond is most often seen, diamonds can be mined in many colors; yellow and brown being the most common. The rarest and most prized colored diamond is the brilliant blue diamond. The April birthstone, the diamond, due to its brilliance and fire, has become the symbol of love.
MAY
Emerald, the May birthstone, is a rich green color that is reminiscent of mother nature and springtime. The most valued Emeralds are mined in Colombia and their deep green color that reflects the jungles in which they are found. Emeralds have become a symbol of rebirth and love.
JUNE
The two birthstones of June are Pearl and Alexandrite. The Alexandrite, a spectacular and cherished gemstone, is known as the color change gem as it changes color based on the lighting. Pearls are extremely popular due to its elegant natural beauty. Pearls are formed when an irritant, such as a piece of sand, enters an oyster. The oyster coats the piece of sand over and over to form a pearl and gives the pearl its iridescence shimmer.
JULY
The ruby, the birthstone of July, is a majestic red gemstone that is known as the king of gems. Rubies represent health, wisdom, and courage. It was once believed that wearing a Ruby gemstone brought good fortune to its owner. The most beautiful rubies are mined in Burma and are the second hardest gemstone after diamonds.
AUGUST
Peridot, the birthstone of August, is a dazzling lime green color. The peridot is one of only a few gemstones that exists in only one to bring prosperity, fertility, and healing.
SEPTEMBER
Sapphire, the birthstone of September, is most popular in its varying majestic blue colors. Its name is derived from sappheiros, the Greek word for blue. However, the gemstone sapphire is allochromatic, which means it can be found in every color. The Sapphire has come to represent
OCTOBER
Tourmaline and opal are the two birthstones of October. Tourmaline is available in a rainbow of beautiful colors but most often comes in a pretty pink. Opal gemstones are truly unique because each opal sparkles with a one of a kind color combination. Each opal gem is individual and unique like no other.
NOVEMBER
November is assigned two unique birthstones, Citrine, and Yellow Topaz. Citrine is from the French word citron, meaning lemon, named appropriately for its brilliant yellow color. The Citrine is believed to be a healing gemstone and was once thought to be a gift from the sun. November's alternative birthstone, Topaz, is most desired in its orange Imperial Topaz color. However, Topaz is mined in a variety of rich colors like blue, pink, and yellow.
DECEMBER
December has a claim to three birthstones, Zircon, Tanzanite and Turquoise. All three of these precious gemstones shine in different shades of brilliant blues. Their blue tones make these gems the perfect birthstones for the cold wintry month of December.